Category Archives: food+drink

Ennismore Terrine, 2022 Variation

Over the years I’ve written a number of times about our exploits making terrine – most notably what we’ve dubbed Ennismore Terrine. That post is some 8 years old, but our first rendition of the recipe goes back more like 35 years.

Not the latest creation, but one I made almost 10 years ago which
will give you the overall impression of the result.

While it takes a bit of time to put together, it is very forgiving and can be varied almost infinitely to suit. Just to show the versatility here’s what we did a couple of days ago.

Ennismore Terrine, 2022 Variation
This makes enough to fill a large oval Le Creuset casserole (as above).

Ingredients
200g smoked bacon lardons
400g pork mince
800g chicken livers
400g plain pork sausages, skinned
300g bread without crusts
1 large leek, finely chopped
3 small red onions, finely chopped
7 large mushrooms, finely chopped
6 cloves of garlic, peeled
Generous wineglass of brandy
Half a glass of white wine
2 tablespoons garlic purée
4 tablespoons tomato paste
Large bunch of tarragon, leaves only
1 large egg
Pinch of salt and a generous grind of black pepper
2 tablespoon Worcs. sauce
Olive oil
Knob of butter

Method

  1. Put the bread, tarragon, salt and pepper, garlic cloves in a food processor and whizz to a crumb. Transfer to a very large mixing bowl (actually we used a roasting tin!)
  2. Add the sausage meat, half a glass of the brandy, Worcs. sauce and the egg to the food processor and whizz again to a smooth paste. Transfer this to a large mixing bowl.
  3. Heat a drizzle of olive oil in a frying pan and sweat the leek until going translucent. Add to the mix along with the mushrooms.
  4. With a bit more olive oil fry the onion until translucent. Tip this out into the food processor with the garlic purée and tomato paste.
  5. With a little more oil if needed fry the bacon until the outside is seared and browning but still undercooked inside. Add this to the food processor and whizz lightly; do not purée. Add this to the mix.
  6. Now fry the chicken livers for a few minutes again until the outside is beginning to brown but not cooked through. (As the livers aren’t fully cooked don’t go tasting the mix!) Add this to the food processor and whizz; it will make a slurry. Add this to the meat mix.
  7. Finally fry the pork mince until lightly browned but also not cooked through, and put this in the food processor.
  8. Deglaze the pan with the rest of the brandy and the white wine. Add this to the food processor and whizz to a rough paste; don’t worry if it looks grainy. Add this to the meat mix.
  9. Mix everything together thoroughly; don’t be afraid to use your hands.
  10. Butter the casserole generously.
  11. Pour the meat mix into the casserole and firm it down well. Cover with foil and if possible a tight fitting lid. It is wise to put this on a baking sheet as a full casserole may bubble juices over the edge – as in the above photo!
  12. Cook in the oven at 170°C/fan 160°C/ gas 3 for 1½-2 hours. It is done when a knife stuck in the terrine for a few seconds comes out very hot (or a meat thermometer at 80°C).
  13. Remove from the oven and if possible weight the terrine to press it (something flat with tins of beans or a brick on it works; heavier is better).
  14. Allow to cool for a couple of hours and transfer to the fridge overnight, still with the weights.
  15. Serve with crusty bread and a glass of robust red wine.

This variation turned out quite liver-y; if this isn’t to your taste adjust the proportions of pork and liver. The leek and mushroom made a nice background, and the tarragon came through well. All round it is extremely more-ish, and has the seal of approval from the Rosie cat.

Cheese, Ham & Veggie Tart Thing

Here’s another variation on the flat tart theme – alternatively it’s a variation on pizza as it uses a base of tomato sauce and cheese.

Cheese, Ham & Veggie Tart Thing

Serves: 4 as a main course, or 6-8 as a starter or finger food

For Quick Tomato Sauce
100g Double Concentrate Tomato Paste
2tbs Garlic Puree
1tbsp Worcs Sauce
1tbsp Olive Oil
½tsp Porcini Powder
Black Pepper

For the Topping
lots of grated Cheddar Cheese
4 or 5 Tomatoes, thickly sliced
1 large Shallot, or a small Red Onion, finely sliced
80g Ham, sliced into 1cm pieces
Vegetable topping of your choice**
bunch Fresh Herbs of your choice (optional)
freshly ground Black Pepper

For the Base
500g pack Puff Pastry
Milk to glaze

** I used a few spears of purple sprouting broccoli (‘cos that’s what I had to hand) but you could use asparagus, sliced pepper, mushrooms or whatever you choose. And then add olives, anchovies, capers if such is your predilection. If you want a veggie option, leave out the ham.

This is What You Do

  1. Pre-heat the oven to 220°C/200°C fan/Gas 7.
  2. In a small bowl, mix together all the tomato sauce ingredients until well blended.
  3. Prepare a 30cm square baking sheet (or similar). I always line the baking sheet with a piece of baking parchment, stuck down with 4 or 5 tiny dabs of butter: the butter stops the parchment sliding around, makes removing the tart easier, and the baking sheet easier to wash.
  4. Roll out the pastry to a size slightly larger than the baking sheet.
  5. Put the pastry on the baking sheet, dampen the edges with milk and roll them over to make an edge.
  6. Spread the tomato sauce over the pastry, followed by a layer of cheese.
  7. Then the onion, ham and herbs; followed by more cheese, the tomatoes and the veg.
  8. Season with black pepper and brush the edges of the tart with milk to glaze.
  9. Bake, covered with foil for about 20 minutes. Remove the foil and give it another 10 minutes or so until cooked and golden brown – you want the pastry and veg cooked.
  10. Serve hot or warm as a starter, main course, or supper with a glass of red wine. Or cold for a buffet. Any leftovers make a tasty lunch (or breakfast).

Sorry, no photo because we ate it!

Red Bananas

Yes, red bananas. They do seem to be a thing. Although I think I’d heard of them they recently came to my consciousness as our local supermarket was stocking them. In the interests of experimentation, I tried them so you don’t have to.

So what are they like?

Well, the clue is in the name. They are bananas, and they’re a red/brown colour: not really properly red, more a dark maroon. The flesh is pale on the outside, but once bitten into is noticeably darker yellow inside.

The ones I got were rather too ripe for my particular taste (I like fruit on the under ripe side) and as a result they were soft with a floury texture, a bit like … well … a ripe banana.

The taste was slightly odd. Clearly banana but with a much more pronounced banana flavour – basically from isoamyl acetate – compared with normal yellow bananas. But also somewhat more fruity.

Overall, for me, this gave a rather unpleasant mouthfeel. They may be better if under ripe, but I won’t be hurrying to repeat the experiment.

Overall Verdict: ★☆☆☆☆ Meh. Don’t bother.

Rustic Apricot & Marzipan Tart

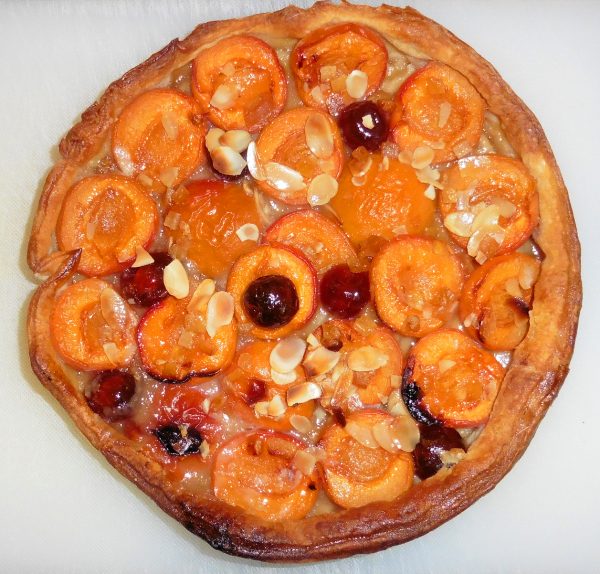
Another culinary delight this evening, which I thought up lying in bed last night! This apricot & marzipan tart was designed partly to use up a spare piece of marzipan to complement some apricots. Like much of what I cook, it’s rustic because doing precisely pretty isn’t my thing.

Apricot & Marzipan Tart
Here’s the actual one I made earlier
Ingredients
  • 1 pack puff pastry
  • 2 punnets fresh apricots (or indeed any stone fruit)
  • marzipan
  • 50ml Amaretto (or similar almond liqueur; or Cognac)
  • 1tsp almond essence
  • ½tsp sugar
  • glacé cherries (optional)
  • candied peel (optional)
  • flaked almonds (optional)
  • butter for greasing
  • 1tsp icing sugar for dusting (optional)
What to do
  1. Preheat the oven to 220C/fan 200C (or according to the pastry instructions).
  2. Rinse and halve the apricots, removing the stones and blemishes.
  3. Grease a 20cm (or thereabouts) flan tin.
  4. Rollout the pastry as thinly as possible, and line the tin. Trim off any excess pastry (and keep it). Prick the base all over with a fork.
  5. Line the case with baking parchment and add baking beads (or dried beans).
  6. Blind bake the pastry case for 10 minutes.
  7. Meanwhile mix the Amaretto, almond essence and sugar to make a glaze.
  8. Slice (or roll) the marzipan quite thinly (2mm is good) so you have enough to cover the base of the tart.
  9. When blind baked, remove the pastry case from the oven, and remove the baking beads (this will be easier if you have the parchment to pick up).
  10. Cover the base of the tart with marzipan, using fragments to fill the corners and gaps.
  11. Brush the marzipan with the Amaretto glaze.
  12. Now layer the apricots on the marzipan, in whatever decorative manner you wish.
  13. Brush the apricots, and exposed pastry with glaze.
  14. Add a few glacé cherries, a sprinkle of candied peel, and a sprinkle of flaked almonds if wished.
  15. Bake for about 30 minutes until beginning to colour and the apricots are soft.
  16. Remove from oven, and while still hot brush the apricots with any remaining glaze.
  17. Allow to cool until still slightly warm before removing from the tin, dusting with icing sugar (if wished) and serving either nude or with some thick double cream and a glass of Armagnac.

If you have some apricot halves left over (as I did) use them with the pastry offcuts. Reroll the pastry (no it doesn’t do puff a lot of good, but what the hell) to make some roughly 15cm squares (they don’t have to be neat). Brush the pastry with the Amaretto glaze. Put an apricot half or two or three on each piece of pastry, with a glacé cherry if wished. Fold the pastry over the fruit, seal and glaze. Bake in the oven for about 30 minutes.

Quick Bread Lasagne

Making lasagne is a time consuming fiddle, and despite likin it I generally can’t be bothered. But in a spirit of adventure the other day we tried out a quick way of making it: use bread, not pasta (yes, really, it does work!), and some of the contents of the freezer. There’s no making Bolognaise sauce from scratch, nor having to cook sheets of pasta, so it’s fairly quick and easy.

This is flexible, and you can obviously substitute according to what you like and/or have available – it’s a good way to use up some of the odd portions of food languishing in the freezer (or just to make a bit more room). It would be just as easy to do veggie or even vegan. Oh, and all the frozen ingredients, and the bread, were homemade!

What follows made two hearty meals for the two of us. You should adjust quantities as necessary. This is what we used …

For the meat sauce
1 portion frozen Bolognaise sauce, thawed
1 portion frozen chilli con carne, thawed
a good quantity of frozen tomato sauce, thawed
a pack of frozen barbeque sauce, thawed

For the white sauce
butter
flour
milk
grated cheese
black pepper
a pack of frozen onion sauce, thawed (that’s white sauce with onions)

For the lasagne
5 (or more) large 10mm thick slices of bread, crusts removed

To finish
butter
grated cheese
black pepper

And this is what we did …
1. Pre-heat the oven to 200C/180C fan.
2. Well butter a large roasting dish (I used our largest glass roasting dish).
3. Roll out the bread slices so they are thin, like actual lasagne.
4. Put all the meat sauce ingredients in a saucepan and heat through thoroughly.
5. Meanwhile make a good thick cheese sauce according to your usual method (don’t be mean with the cheese); add and blend in the onion sauce.
6. When the sauces are ready, put a layer of meat sauce in the bottom of the roasting dish. (You’re aiming for at least 2 full sets of layers.)
7. Now add a layer of bread to cover the whole dish, and a sprinkle of grated cheese.
8. Follow this with a layer of cheese sauce.
9. Repeat the layers as required, finishing with a layer of cheese sauce.
10. Sprinkle with some more grated cheese and black pepper.
11. Bake in the over for 30-45 minutes until browning nicely.
12. Serve with a robust red wine.

This was really tasty. The barbeque sauce and the chilli gave it a nice tangy, but gentle kick.

However, do not expect this to cut nicely into portions when it is hot; it’ll probably collapse, but will taste just as good. However when cooled it should be solid enough to portion prettily before reheating in the microwave.

Sorry no picture! It was so good we ate it !

Peppers with a Haggis Stuffing

For some reason, which I never understood, it was a semi-tradition with my parents to have haggis at New Year. And it is something which Noreen and I have mostly continued.

Why is it that so many people dislike haggis? I wonder how many have actually tried it! Yeah, OK, it is made with sheep’s offal, and many are squeamish about eating offal. For me it is tasty, peppery, and good, filling food; there’s nothing to dislike. I won’t say it is a staple in our house, but it’s something we eat several times a year, and there’s always on on stand-by in the freezer. And you don’t have to eat it with the traditional bashed neeps (swede) and mashed potato. Why not try it as the filling in a “Shepherd’s Pie”?

Anyway this New Year I decided to try something different.

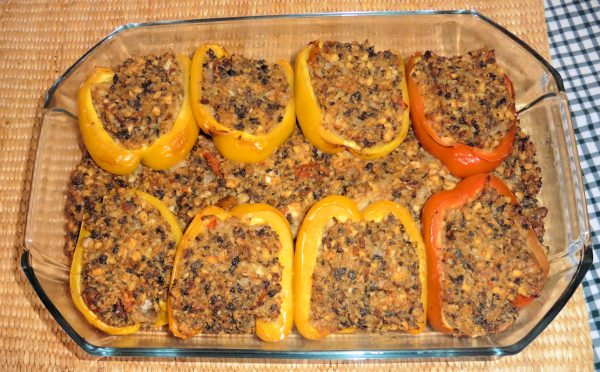
Peppers with a Haggis Stuffing

For once I remembered to take a photo!

You will want …

  • medium or large bell peppers, at least one per person (I used four)
  • a 500gm haggis
  • a packet of stuffing mix
  • 2 “banana” shallots or a medium onion
  • as much garlic as you wish
  • 2 soft tomatoes
  • (optional) some flavouring, like 1-2tbsp HP sauce, or a good slug of Worcester Sauce, or a double whiskey
  • olive oil and/or butter
  • freshly ground black pepper

This is what I did …

  1. Pre-heat the oven to 200°C/fan 180°C.
  2. Finely chop the onion, garlic and tomatoes and sweat them in a little olive oil and/or butter until translucent and getting sticky.
  3. Meanwhile halve the peppers (I find they cook better halved); remove the stalks, seeds and pith. Set aside.
  4. Put the stuffing mix in a large mixing bowl and rehydrate with hot water according to the packet instructions.
  5. Remove the skin and chop the haggis into smallish pieces. Add to the stuffing mix and work together well, breaking down the haggis further.
  6. Add the onion & tomato mix, flavouring and some ground black pepper (to taste). Mix well.
  7. Fill the pepper halves with the haggis stuffing and put on one side.
  8. Grease an oven-proof roasting dish, and if there’s any haggis stuffing left over (there probably will be) put it in the dish and sit the stuffed pepper halves on top.
  9. Cover with foil and bake in the oven for about an hour. Remove the foil for the last 15-20 minutes to lightly crisp the stuffing.
  10. Serve accompanied by an alcoholic drink of your choice (beer or whiskey work well) and optionally some green vegetables.

Any leftovers will make a nice cold snack lunch (or even sandwiches).

This was tasty and tangy but not overpoweringly haggis-y – I reckon you could serve it to many people and they’d not know they were eating haggis.

The Taming of the Tarts

As regular readers will know, from time to time I make rustic tarts, or galette – see for example here and here. Hitherto I’ve used commercial puff pastry because (a) I’m lazy and (b) I’ve never considered myself a good pastry cook. My typical pastry method has been my mother’s wartime approach of throwing flour, butter and water (or milk) together and rolling it out. While this is not good, I’ve always felt using commercial pastry is a bit of a cheat, and I should be better at making my own (although I draw the line at the faff of puff pastry).

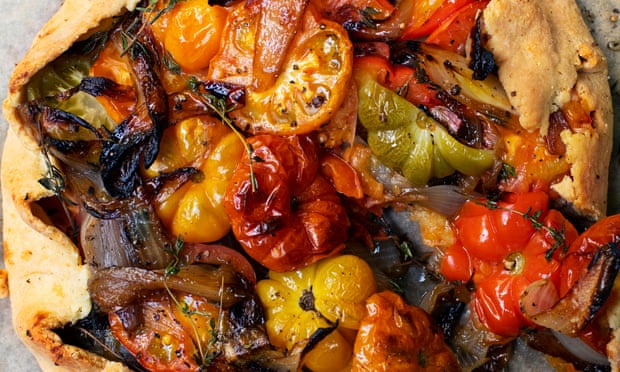
So a few weeks ago I came upon a Nigel Slater recipe for a rustic tomato & shallot tart, and discovered he has been experimenting with pastry. It’s worth reading his recipe before we proceed. I’ll wait …

This is Nigel Slater’s version

So now you know what we’re trying to do. I had never considered polenta in a pastry recipe before, let alone baking powder! So of course I had to try it. I had no polenta, so tried without. It was OK, but a bit bland; the pastry needed a flavour lift, like more salt. Polenta isn’t going to do that, but I needed to get some anyway. So I had a think. Ah-ha! That old stand-by Parmesan will give a flavour lift as well as some additional saltiness. So in true fashion I set out to “augment” the recipe.

And at the same time I thought there must be a way to do a sweet version for a fruit tart. And there is, as you will see. But first this is how I did a Tomato & Onion Tart.

Rustic Tomato & Onion Tart

For the pastry
250g plain flour
1 tsp baking powder
65g fine polenta
50g finely grated parmesan
90-100ml good olive oil
6-7 tbsp iced water

For the filling
700g large shallots or red onions
3 tbsp good olive oil
250g tomatoes, preferably small-medium and varied colours
good bunch of fresh herbs (your choice but thyme is good) torn not chopped
parmesan flakes (optional)
3 cloves garlic, finely sliced (optional)

What you do

  1. Make the pastry: sieve together the flour and baking powder into a bowl to make sure they are evenly mixed.
  2. Stir in the polenta, parmesan and a generous pinch of salt, then the olive oil.
  3. Mix to a firm and rollable dough with the iced water. You may find you need a little more water or oil, but go carefully; you don’t want it too wet.
  4. Wrap the dough in kitchen parchment and leave to rest in the fridge for 20 minutes.
  5. Peel the onions, and cut lengthways into 5-10mm segments.
  6. Heat the olive oil in a wide, shallow-sided pan and sweat the onions over a low to moderate heat, for a good 25 minutes, until soft and pale gold. As they soften add a good grind of black pepper. Remove from the heat.
  7. Set the oven at 180°C fan.
  8. Give the pastry a good kneading for a minute or so to soften it.
  9. Roll the pastry (dust with a little polenta) to a rough 30cm circle (or larger if you can roll pastry that thin) and place on a baking sheet lined with parchment.
  10. Leaving a 3-5cm rim of pastry around the edge, spread the softened onions loosely over the pastry.
  11. Scatter over the garlic, torn herbs and enough parmesan flakes for a light scattering.
  12. Cut the tomatoes into thick slices and put top; add sprigs of herbs if you wish.
  13. Trickle a little olive oil over, season with salt and ground black pepper.
  14. Fold over the pastry edges to make a rustic galette.
  15. Brush the pastry edges with milk or beaten egg (and use a brush of glaze to help stick the pastry folds together if needed).
  16. Bake in the preheated oven for 30-35 minutes.
  17. Allow the tart to settle and cool for a few minutes; serve warm or cold.

That was good; it worked well and the parmesan provide the necessary lift. I’m not sure the parmesan flakes are quite right; something like cheddar might work better; or possibly even better dot the top with bite-size pieces of brie. Of course you can easily make this vegan by leaving out the cheese.

So now, here is how I did the fruit version. It’s essentially the same, just fruity.

Rustic Fruit Tart

For the pastry
250g plain flour
1 tsp baking powder
65g fine polenta
50g caster or icing sugar
65g ground almonds
90-100g butter
6-7 tbsp iced water

For the filling
a selection of fruit of your choice, for instance a couple of punnets of raspberries maybe with a handful of blackberries; or peaches; nectarines; apricots; plums; strawberries; blackcurrants; gooseberries; rhubarb; apples – enough to make a layer about 2cm thick

What you do

  1. Make the pastry: sieve together the flour, icing sugar (if using) and baking powder into a bowl to make sure they are evenly mixed and any lumps broken down.
  2. Stir in the polenta, caster sugar (if using), ground almonds, and a good pinch of salt.
  3. Add the butter and rub together to a breadcrumb texture. Don’t stint on the butter; you want a good buttery breadcrumb result, but not a claggy greasy one.
  4. Mix to a firm and rollable dough with the iced water. Go carefully with the water, add a little at a time.
  5. Wrap the dough in kitchen parchment and leave to rest in the fridge for 20 minutes.
  6. Set the oven at 180°C fan.
  7. Prepare the fruit; larger (stone) fruit should be sliced or halved; berries just need checking over, rinsing and stalks removed.
  8. Give the pastry a good kneading for a minute or so to soften it.
  9. Roll the pastry (dust with a little polenta) to a rough 30cm circle (or larger if you can roll it that fine) and place on a baking sheet lined with parchment.
  10. Leaving a 3-5cm rim of pastry around the edge, dust the pastry with a small amount of sugar.
  11. Pile the fruit on the dusted pastry, arranging it prettily if you wish.
  12. Fold over the pastry edges to make a galette.
  13. Brush the pastry edge with milk or beaten egg (and use a brush of glaze to help stick the pastry folds together if needed).
  14. Dust with a little further sugar if wished.
  15. Bake in the preheated oven for 30-35 minutes.
  16. Allow the tart to settle and cool for a few minutes before serving it warm with cream or ice-cream.

I actually used some raspberries and a few home-grown blackberries. And I used icing sugar (‘cos I happened to have some open). It worked well, although it was quite juicy when just out of the oven, but firmed up in an hour or so.

I also found this sweet pastry was much easier to roll. I guess that’s the difference between olive oil and butter; so I think I might try the savoury version with butter next time. But both pastries were much nicer to work with than what I’d done in the past.

So yes, I will be doing this again.

(Sorry no pictures as they got eaten too eagerly!)

Eating 30-a-Week

A couple of years ago I wrote about how we should be eating at least 30 different plant foods a week. Research into this is continuing, especially by Prof. Tim Spector of King’s College, London. I’ll link to just two relevant items: Spector’s recent Top 5 Tips for a Healthier Gut Microbiome and this Mail+ article.

This prompted me to log how well I did against the 30-a-week target over four weeks starting on 5 July. Herere’s what I achieved.

W/C 5 July

  1. Strawberry
  2. Oats
  3. Avocado
  4. Tomato
  5. Cherries
  6. Wheat (bread)
  7. Apricots
  8. Onion
  9. Runner Beans
  10. Carrots
  11. Apple
  12. Potato
  13. Grape (wine)
  14. Gooseberry
  15. Horseradish
  16. Raspberry
  17. Almonds
  18. Chocolate
  19. Garlic
  20. Cannellini Beans
  21. Rice
  22. Spinach
  23. Butter Beans
  24. Banana
  25. Cashew Nuts
  26. Pecan Nuts
  27. Hazel Nuts
  28. Nectarine
  29. Kidney Beans
  30. Chicory
  31. Mint
  32. Mushroom
  33. Cabbage
  34. Coriander
  35. Tarragon
  36. Olives
  37. Yellow Pepper
  38. Chilli
W/C 12 July

  1. Apricot
  2. Loganberry
  3. Avocado
  4. Wheat (bread)
  5. Nectarine
  6. Oats
  7. Gooseberry
  8. Chicory
  9. Tomato
  10. Garlic
  11. Onion
  12. Olives
  13. Coriander
  14. Lemon
  15. Walnuts
  16. Raspberry
  17. Grape (wine)
  18. Rapeseed (oil)
  19. Horseradish
  20. Cashew Nuts
  21. Chard (leaves)
  22. Radish (leaves)
  23. Lime
  24. Cucumber
  25. Potato
  26. Macadamia Nuts
  27. Butter Beans
  28. Cannellini Beans
  29. Mushroom
  30. Rice
  31. Parsley
  32. Strawberries
  33. Cherry
  34. Chocolate
W/C 19 July

  1. Wheat (bread)
  2. Olives
  3. Tomato
  4. Avocado
  5. Nectarine
  6. Cucumber
  7. Barley (beer)
  8. Hops (beer)
  9. Lemon
  10. Cashew Nut
  11. Pistachio
  12. Potato
  13. Haricot Beans
  14. Cherry
  15. Apricot
  16. Chocolate
  17. Onion
  18. Mint
  19. Rice
  20. Aubergine
  21. Mushroom
  22. Spinach
  23. Peanuts
  24. Rapeseed (oil)
  25. Strawberry
  26. Pumpkin Seeds
  27. Pine Nuts
  28. Almonds
  29. Pecans
  30. Brazil Nuts
  31. Parsley
  32. Lime
  33. Raspberries
  34. Hazelnuts
  35. Black Currant
  36. Chilli
  37. Grape (wine)
W/C 26 July

  1. Wheat (bread)
  2. Raspberry
  3. Cherry
  4. Avocado
  5. Tomato
  6. Rapeseed (oil)
  7. Lime
  8. Onion
  9. Garlic
  10. Lettuce
  11. Red Pepper
  12. Mint
  13. Olives
  14. Brazil Nuts
  15. Pecan Nuts
  16. Almonds
  17. Gooseberry
  18. Oats
  19. Nectarine
  20. Horseradish
  21. Lemon
  22. Chicory
  23. Fennel
  24. Potato
  25. Cucumber
  26. Walnuts
  27. Apricots
  28. Spinach
  29. Butter Beans
  30. Rice
  31. Peanuts
  32. Mushroom
  33. Strawberry
  34. Parsley
  35. Grape (wine)
  36. Barley (beer)
  37. Hops (beer)
  38. Chocolate
  39. Pineapple
  40. Mango

[This excludes most condiments & pickles; tea; squash etc.]

That’s over 30 every week for four weeks, and is fairly typical of my normal diet – perhaps slightly better than average because of the availability of summer fruit. I really didn’t try especially to pick foods which would add to my total!

What’s more I make it 64 different foods over a four week period. Which is just plain crazy!

Could I do even better? Yes, probably; but apart from adding in winter vegetables I’d have to try fairly hard.

Seafood Pasta

Last evening I did yet another variation on my quick pasta recipe. I keep tweaking this recipe (usually as the mood takes me) and it keeps getting better! This time I used some frozen mixed seafood.

Serves: 2 (if greedy/hungry) or 4 (as a normal main course)
Preparation: 15 minutes
Cooking time: 15 minutes

You will want:

  • Pasta (variety of your choice, I used some dried shapes)
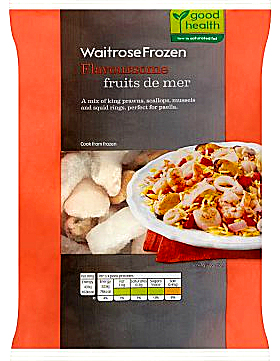
  • 400g mixed seafood (I used Waitrose frozen raw Fruits de Mer containing king prawns, squid, mussels and scallops)
  • 100g button mushrooms, halved
  • 12 cherry tomatoes
  • 1 or 2 medium red onions, not too finely chopped
  • 6 cloves garlic, chopped small or crushed
  • 12 olives, stoned and halved (optional)
  • Juice and zest of 2 limes (or 1 lemon)
  • a small chilli, chopped fine, seeds removed if very hot (optional)
  • a big bunch parsley, stems removed but not chopped
  • 2 tbsp tomato paste
  • 2 tbsp thick double cream (optional)
  • Black pepper
  • Olive oil and/or butter

And this is what you do:

  1. Have everything prepared and ready, and get the pasta on to cook.
  2. While the pasta cooks, sauté the onion, garlic, olives & chilli in a tablespoon of olive oil and a good knob of butter until translucent (about 5 minutes).
  3. Add the seafood to the pan, put on a lid, and allow to cook for 10 minutes. (If you’re using ready cooked seafood, then start this only once the pasta is done, and cook for only 2-3 minutes.)
  4. Remove the lid and add the mushrooms, lime (or lemon), and a good grind of black pepper; cook for a further minute or two. (Don’t worry if this looks too wet; we want some sauce. If too dry add a splash of white wine or dry vermouth.)
  5. Now add the tomatoes, and keep cooking for another minute or two to get the tomatoes hot through but not disintegrating.
  6. Now add the parsley and tomato paste; adjust the amount of tomato paste to thicken the sauce to your preference.
  7. Remove the pan from the heat and stir in the cream.
  8. Return to a very gentle heat and add the cooked and drained pasta. Coat the pasta in the sauce.
  9. Serve immediately in warmed pasta dishes. Garnish with a bit more parsley and/or grated parmesan if desired. And of course a glass of chilled white or rosé wine on the side.

Enjoy! We did!

Early Chilli Harvest

Today I have harvested the first of this year’s chillies: a dozen fully ripe Scotch Bonnets from the four plants on the study windowsill.

These are last years plants, and they’re getting cramped in a single 9-10 inch diameter pot! After they finished flowering last autumn I left them on the windowsill, and kept them watered. They continued to flourish as they were getting some warmth and good light, but not enough to keep flowering.

Then in late February I cut them back to about 10 inches. Within days they were growing new side shoots, and within a few weeks were flowering. They’re now good compact plants! Today’s harvest is the result.

These are two of last years crop;
this year’s have gone straight in the freezer

Although I’ve not repotted them, they have had their soil topped up and been given some feed. So with regular water and more feed, hopefully they’ll produce more flowers, and chilies, as the summer progresses. Hand pollinating the flowers is the best way to ensure a good crop – an old small watercolour brush is their best sex toy.

I might even try to keep them over another winter although they really will need repotting by then!